Posted on

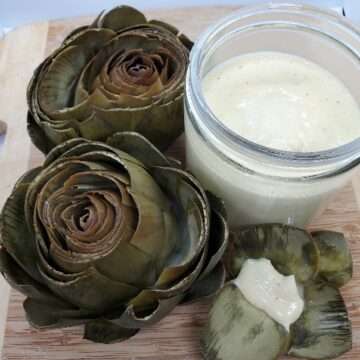
Artichokes with Hollandaise

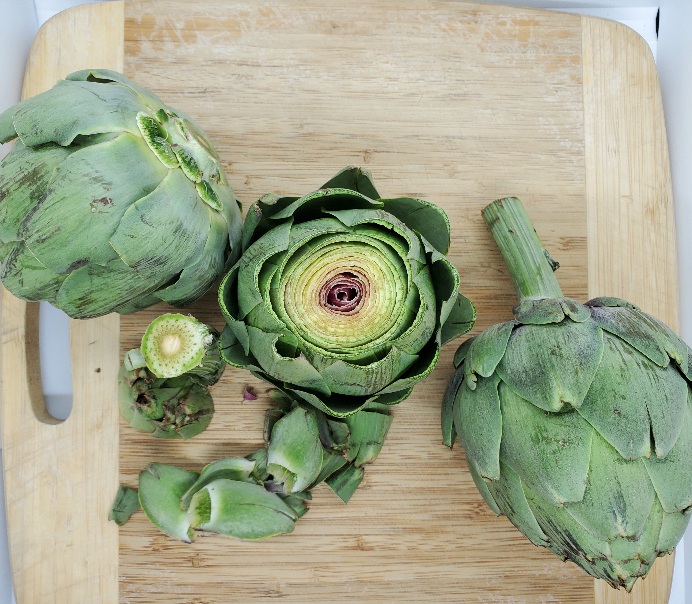
cleaning artichokes

Artichokes with Hollandaise

Chef Leah Burback
Whole fresh artichokes steamed with rich zingy hollandaise sauce. Try this classic fun appetizer as a date night experience!
Prep Time 20 minutes
Cook Time 40 minutes
Total Time 1 hour
Course Appetizer, sauce, Side Dish
Cuisine American, French
Servings 4 people

Equipment

  • blender

Ingredients
  

Hollandaise

  • 10 Tbsp unsalted butter if using salted butter, skip the added salt
  • 3 each egg yolks see how to separate eggs
  • 1 Tbsp lemon juice
  • ½ tsp salt
  • â…› tsp cayenne optional

Artichokes

  • 2 each Fresh artichokes look for bright colors and heavy feel
  • 2 slices Lemon
  • 2 each Bay leaf
  • 2 each Garlic cloves

Instructions
 

Hollandaise Sauce

  • Melt the butter on low in a small pot. Try not to let it boil—you want the moisture in the butter to remain there and not steam away.
  • Add the egg yolks, lemon juice, salt and cayenne into your blender. Blend the egg yolk mixture at a medium to medium high speed until it lightens in color, about 20-30 seconds.
  • Once the yolks have lightened in color, turn the blender down to its lowest setting (if you only have one speed on your blender it will still work), and drizzle in the hot melted butter slowly, while the blender is going. Continue to blend for another couple seconds after the butter is all incorporated. Take care not to blend too high or too long to over thicken.
  • Turn off the blender and taste the sauce. It should be buttery, lemony and just lightly salty. If needed, you can add a little lemon juice or salt to taste.
  • If you want a thinner consistency, add a little warm water. Pulse briefly to incorporate the ingredients one more time.
  • Store until needed in a warm spot and use within an hour or so. Store any unused in an airtight container. Warm over a double boiler and blend on low until smooth once more.

Steamed Artichokes

  • With a pair of kitchen scissors, snip off the tips of the artichoke leaves, they're sharp. With a super-sharp, heavy-duty knife, lop off the top of the artichoke – about 3/4 of an inch worth and cut off the stem at just below the base of the artichoke so that it will sit flat. Remove the bottom row of leaves. Rinse well under cold water.
    cleaning artichokes
  • Fill a large pot with about two inches of water and set in the artichokes, bottom side down. Optional: add a bay leaf, a slice of lemon, and/or a garlic clove. Set on the stove and bring to a boil over high heat, then reduce the temperature on the water to medium, reducing it to a simmer.
    blank
  • Cover and steam the artichokes for about 30-40 minutes, until tender. You can check for doneness by inserting the tip of a knife into the bottom (if it goes in with only a little resistance they're done) or by pulling off a tester leaf (it should come off easily). Remove from water, allow to cool a bit, and serve with warm hollandaise or garlic herb butter.
    blank
Keyword artichokes, date night, hollandaise, mother sauce, steamed, tasting dinner, valentine’s day menu
Posted on

Dublin Coddle

blank
blank

Dublin Coddle

Chef Leah Burback
Slow cooked irish braise with potatoes, cabbage, bacon/sausage, and onions. A nice one pot recipe to warm you and your family on the coldest early spring nights.
Prep Time 25 minutes
Cook Time 1 hour 30 minutes
Assembly 5 minutes
Total Time 2 hours 5 minutes
Course Main Course, Soup, Stew
Cuisine American, Celtic, Irish, Peasant
Servings 6 people

Equipment

  • dutch oven or oven safe soup pot with lid

Ingredients
  

  • 10 strips Applewood smoked bacon cut into 1-inch pieces thick-cut about ½-¾ lb.
  • 1 ¾ pound about 5 quality pork sausages
  • 4 each small yellow onions sliced
  • 1 cup cabbage cut into 2" squares
  • 1 cup carrots large dice
  • 3 lb. russet potatoes roughly peeled and diced into large bite-size pieces
  • 2 Tbsp fresh parsley minced
  • to taste kosher salt and black pepper
  • 2 cups chicken stock low-sodium

Instructions
 

  • Preheat oven to 300 degrees.
  • Place bacon into a 5-quart Dutch oven and heat over medium to medium-low until cooked and crispy, about 18-20 minutes. Using a slotted spoon, transfer the bacon to a paper towel lined plate.
  • Sear sausages for 3 to 4 minutes on both sides. Transfer to a cutting board and slice into thirds.
  • Remove the pot from the burner and layer, onions with a pinch of salt and parsley, bacon, sausages, more parsley, potatoes, cabbage, carrots, and then a few pinches of both salt and pepper and the remaining minced parsley.
  • Pour stock over top, cover and place back onto burner. Bring liquid up to a boil before covering and transferring pot to preheated oven for 1 hour and 30 minutes or until the potatoes are fork tender. Adjust seasoning to taste.
  • Remove and ladle into bowls with a little of the broth and serve immediately with sourdough or brown bread.
Keyword bacon, braising, cabbage, Dublin, potato, Sausage, Slow Cooked, Stew
Posted on

Potato Latkes

blank
blank

Potato Latkes with Carmelized Cabbage

Chef Leah Burback
Traditional potato pancakes with carmelized cabbage shreds as a rich hearty side dish or grazing item. Peasant foods that traveled with immigrants from Eastern Europe.
Prep Time 35 minutes
Cook Time 10 minutes
Total Time 45 minutes
Course Appetizer, Main Course, Side Dish
Cuisine Eastern European, Peasant
Servings 3 dozen

Equipment

  • box grater or grater of your choice

Ingredients
  

  • 2 large potatoes about 1 pound, scrubbed and cut lengthwise into quarters
  • 1 large onion 8 ounces, peeled and cut into quarters
  • 2 large eggs
  • ½ cup all-purpose flour
  • 2 teaspoons coarse kosher salt or 1 teaspoon fine sea salt, plus more for sprinkling
  • 1 teaspoon baking powder
  • ½ teaspoon freshly ground black pepper
  • high temp frying oil i.e. sunflower or safflower

Instructions
 

  • Grate the potatoes and onion. Transfer the mixture to a clean dishtowel and squeeze and wring out as much of the liquid as possible.
  • Working quickly, transfer the mixture to a large bowl. Add the eggs, flour, salt, baking powder and pepper, and mix until the flour is absorbed.
  • In a medium heavy-bottomed pan over medium-high heat, pour in about 1/4 inch of the oil. Once the oil is hot (a drop of batter placed in the pan should sizzle), use a heaping tablespoon to drop the batter into the hot pan, cooking in batches. Use a spatula to flatten and shape the drops into discs. When the edges of the latkes are brown and crispy, about 5 minutes, flip. Cook until the second side is deeply browned, about another 5 minutes. Transfer the latkes to a paper towel-lined plate to drain and sprinkle with salt while still warm. Repeat with the remaining batter.
Keyword appetizer, pancake, peasant dish, penny saving, thrifty
Posted on

Crispy Bean Cakes

blank
blank

Crispy Bean Cakes

Chef Leah Burback
Prep Time 10 minutes
Cook Time 15 minutes
rest time 5 minutes
Total Time 30 minutes
Course Appetizer, Breakfast, Main Course, Side Dish, Snack
Cuisine American, Eastern European, French, Latin American, Peasant
Servings 4 servings

Equipment

  • food processor
  • Spatula
  • Frying pan

Ingredients
  

  • 2 cups Black Beans cooked (or 1 can)
  • as needed bean pot liquor or veggie stock
  • 1 cup Oat Flour GF Harvest
  • 1 cup Rolled Oats GF Harvest or cooked quinoa
  • as needed Bread Crumbs or puffed quinoa cereal
  • as needed Oil or ghee optional, if you fry them
  • 1 ½ tbsp Flax Seeds ground
  • 1 ½ tsp Salt
  • 1 tsp Smoked Paprika
  • 1 tsp Garlic powder
  • 1 tsp Onion powder

Instructions
 

  • To fry: Fill cast iron skillet with about 1 inch of sunflower or avocado oil. Bring the temperature up to 350°F over medium heat.
    To pan fry: Heat a medium-sized cast iron skillet to medium-high heat
    To bake: Preheat your oven to 425° F
  • Place drained beans into a food processor and gradually add liquid and process until just smooth and pureed.
  • Combine your rolled oats, oat flour, ground flax seed, bean purée and seasonings till fully incorporated, let rest for 5 minutes for oats to absorb into the mixture.
  • Portion out into bite size (2 Tbsp.) or two bite size (¼ cup) and roll in bread crumbs for an even coat.
  • To fry: Test a small piece of the mixture, this should sizzle immediately and start to float within a couple of seconds. Fry each meatball about 2-3 minutes on each side, rotating/flipping till dark golden brown all over.
  • To pan fry: To hot cast iron skillet, add 2 Tbsp of oil to the pan per batch of cakes and cook 2-3 minutes per side, should be crispy and golden brown when flipped. Oil should only smoke slightly, if too smoky turn down the heat to medium, each batch added will cool off the heat of the pan slightly, try adjusting the batch size if temperature issues persist.
  • To bake: Spray a parchment lined sheet tray or cast iron pan with olive or avocado oil. Place cakes in neat rows and spray tops as well. Bake for 6-8 minutes until crispy, flipping half way through to ensure carmelization on both sides.
  • Cool cakes on a grate to drip off any excess oil, salt the outside, and serve with green goddess dressing, as a slider option with your favorite burger toppings, or as a meatball substitute in your favorite dishes!

Notes

To increase these crispy delights to a complete protein try substituting the rolled oats or rolling them in puffed quinoa cereal. 
Adjust flavorings to match each dish but stick to dried ingredients or reduce existing recipe liquid accordingly.
Keyword 30 minute recipe, appetizer, croquette, fiber, hearty vegetable, meat alternative, meatless, protein
Posted on

Wyoming Raspberries

SonHarvest Raspberries

Raspberry Vinaigrette

blank

Bring the brightness of Wyoming raspberries to sweet and savory dishes. Simple easy recipe with versatility for many dishes, deliciousness you can keep on hand for any occasion.

  • blender (smoothie or immersion)
  • 1 cup fresh raspberries washed
  • 1/4 cup local honey
  • 1 tsp dijon mustard
  • 1/4 cup red wine vinegar
  • 1 Tblsp kosher salt
  • 1 Tblsp fresh ground pepper
  • 3/4 cup olive oil or sunflower oil
  1. Place all ingredients except oil into a blender.
  2. While blending gradually drizzle in oil until texture changes and dressing becomes emulsified.
  3. Taste, to adjust seasoning or sourness. Adjust consistency with water.
  4. Store in airtight container in the fridge. Shake well before using.

Use on salad greens, as a fruit dip, grain pilafs, and much more!

Appetizer, Breakfast, condiment, garnish, Main Course, Salad, sauce, Snack
American, French
broccoli salad, dressing, fruit, fruit dip, grain pilaf, greens, salad, slaw, vinaigrette

Raspberry Syrup

Preserve the flavor of Wyoming summer with a simple syrup. this easy recipe is a shelf stable option to bring fresh tart flavor to so many dishes.

  • sauce pot
  • canning equipment
  • sieve or strainer
  • 1 lb raspberries fresh or frozen
  • 1 lb local raw honey
  1. Place ingredients in a sauce pot over medium low heat.
  2. Bring to a boil then reduce to a simmer for 10 minutes.
  3. Strain and cool. Store in an air tight container in the fridge for 2 weeks or water bath can for shelf stable storage.

Save pulp for raspberry shrubs or vinegars.

condiment, Dessert, Drinks, garnish, sauce
American, French, Italian
fruit syrup, honey, preserve, raspberries, sweet, tart

Raspberry Mint Spritzer

Try sipping on this tart effervescent refreshment while using our Raspberry Syrup recipe! See notes to adjust this for a mocktail!

  • 1 sprig fresh mint
  • 2 oz vodka
  • 1 oz raspberry syrup
  • ice to fill
  • club soda to top
  • mint for garnish
  1. Slap or bruise mint to release oil.
  2. Place in cup. Squeeze lime over and add lime to cup.
  3. Fill cup with ice.

  4. Top with club soda and stir.

  5. Garnish with mint and enjoy.

Try with Backwards Ringleader Vodka, 307 Vodka, your favorite vodka, or as a mocktail by omitting the alcohol and adding 1 oz additional syrup.

Drinks
American
bubbles, mint, mocktail, raspberry, raspberry syrup, vodka
Posted on

Southern Braised Greens

blank
blank

Southern Braised Greens

Chef Leah Burback
Braised greens have been traditionally made more approachable by the use of butter, bacon, brown sugar, garlic, vinegar, and spice. This recipe uses collard greens, but they are one of many tough bitter greens that contain great nutritional value while being tough to swallow. Enjoy this decadent braised recipe with your favorite southern entrees.
Prep Time 15 minutes
Cook Time 1 hour
Total Time 1 hour 15 minutes
Course Appetizer, Breakfast, condiment, Side Dish, Snack
Cuisine American, Comfort Food, Southern Soul
Servings 6 servings

Equipment

  • heavy bottomed wide stock pot (or rondeau)

Ingredients
  

  • 2 oz Butter or ghee (add 50% more if substituting for mushrooms)
  • ½ lb bacon or mushroms
  • 1 cup yellow onions diced
  • â…“ cup garlic rough chopped
  • 1 Tbsp red chile flakes adjust to preference
  • ¼ cup local raw honey
  • 1 Tbsp molasses, blackstrap
  • ¼ cup apple cider vinegar
  • 4 cups collard greens washed, destemmed, chopped into 2" squares (try other greens like beet, swiss chard, broccoli, kale, or a combination)
  • 1 quart stock or broth low sodium chicken or pork for meat, mushroom or veggie for meatless
  • to taste salt and black pepper

Instructions
 

  • Preheat braising pot(rondeau) over medium heat. Add butter and bacon and saute until the fat renders out of the bacon and starts to get crispy. (or until mushrooms are browned)
  • Add in onions, garlic, and red chile flakes. Sauté until translucent and just starting to caramelize.
  • Stir in honey and molasses until thick and bubbly. Deglaze with apple cider vinegar and reduce down.
  • Start adding greens in large handfuls with 1 cup of stock and stir frequently. Add a new handful of greens with stock until all of both ingredients have been wilted and added.
  • Reduce to a low simmer and cook for at least 30 minutes and the liquid has created a syrup like sauce.
  • Check tenderness and adjust seasoning with salt and black pepper to taste. Greens should not be tough to chew when the braising process is complete.

Notes

Try large kale leaves, broccoli greens, swiss chard leaves and stems, beet greens and stems, or squash leaves. This recipe will help break down greens high in vitamin k and a. Please use caution with foods high in vitamin k as they interfere with blood-thinning medication.
Keyword bacon, braising, butter, eat the rainbow, garlic, peasant dish, Slow Cooked, zero waste
Posted on

Winter Squash Soup

Squash soup

Winter Squash Soup

blank

Rich, creamy, sweet and savory soup that will warm you through to your soul. Simple soup to eat by the bowlful or use as a base for other great dishes.

  • blender or immersion blender
  • 1 each onion, medium size, diced
  • 3 each carrots, medium size, diced
  • 1 each apple, peeled deseeded and chopped ( granny smith, opal, honeycrisp, fuji, gala or pink lady)
  • 3 cloves garlic, smashed
  • 1 each fall/winter squash, peeled deseeded and diced (butternut is the easiest to process but also try dumpling, buttercup, red kuri, blue hubbard, and small pie pumpkins)
  • ¼ cup olive oil
  • 1 quart water or stock (use veggie, chicken, turkey, or corn stock to match desired flavor profile)
  • ¼ cup maple syrup, pure
  • 1 tsp paprika
  • 1 tsp allspice
  • ½ tsp nutmeg
  • ½ tsp cayenne pepper
  • ½ tsp cinnamon
  • 1 Tbsp sea salt
  1. In a wide bottomed soup pot, sauté veggies and apples in olive oil on medium heat.

  2. Once softened, add dry seasonings, and sauté until spices become lightly toasted.(the smell is important here)

  3. Stir in maple syrup and add your stock of choice. Bring this up to a boil and reduce to a simmer until veggies and apples are tender and soft all the way through.

  4. Blend in the pot with an immersion blender, or in batches in the pitcher blender until silky smooth.

  5. Adjust seasoning to taste, add a bit more maple to increase sweetness, lemon juice to bring out the flavors, increase salt if the flavors are muddled, add a bit of oil or a dollop of yogurt if sour.

More tart apples with a tinge of sweetness work best for this soup, lean towards the sweeter side if the carrots or squash are less sweet and out of season. Also keep an eye out for your local apple varieties when they are ready, worth the addition. 

Try using this for a pasta sauce base and add a bit of cream or yogurt with your favorite cheese. Or smother your favorite tamales or burritos.

Top with crispy bacon, grilled chicken, quinoa, tart sweet cranberry sauce, or fresh herbs and goat cheese.


Photo by Cala on Unsplash

Appetizer, broth, garnish, Main Course, sauce, Side Dish, Soup, stock
American, French, Indigineous, Native American, Peasant
appetizer, condiments, eat the rainbow, garnish, hearty vegetable, make ahead, pasta sauce, squash
Posted on

Stuffed Cabbage Rolls

blank

Stuffed Cabbage Rolls

blank

Get the most out of those big leaves of cabbage and make enough comfort food for the whole family. Use techniques like blanching, sauteing filling ingredients according to cook time, and casserole baking.

  • Stock Pot
  • Bowl of Ice Water
  • saute pan
  • mandolin

Cabbage Wraps

  • 12 each Large outer Cabbage Leaves (Cut out the thick center stem up to about halfway up the leaf)
  • 1 gal Salted Boiling Water (Stock Pot)
  • ½ gal Iced Water (Bowl)

Filling

  • 1 lb WY Ground Beef 80:20 (Substitute Mushrooms for Veggie Opt or Half and Half)
  • ½ lb Potatoes, small dice (Russets, yukon gold, or your favorite hash type potato)
  • 1 cup Medium-sized Carrots, small dice (about 2 each)
  • 2 cups Onion, small dice (about 1 large onion. Yellow or White sharp Onions are traditional Red for color and aggressive flavor)
  • 1 cup Cabbage Scraps, chopped small (center veins from larger leaves or other bits that usually don't get used)
  • 4 each Large Cloves Garlic, rough mince
  • to taste Salt and Black Pepper
  • ½ cup Mustard (Smoky Mustard, Whole Grain, or Spicy Brown work well.)
  • 1 Tbsp Worchestershire Sauce (Sub Soy Sauce/Aminos for Vegan)

Filling

  1. Once all ingredients are cut into small dice, preheat a medium-large skillet to medium high heat.

  2. Brown room temperature ground beef and crumble into small pieces as it cooks. Season with a small amount of salt and pepper while browning. When all the beef is browned, remove and reserve in a strainer to seperate excess fat and juices.

  3. In the same saute pan add a couple of tablespoons of the beef fat to the pan and saute potatoes and carrots, season with a small amount of salt and pepper at each addition of vegetables. Cook until the potatoes begin to soften and brown in spots and the carrots begin to change texture (2-3 minutes).

  4. Add in onions and chopped cabbage, saute until translucent and starting to brown. 2 minutes

  5. Add minced garlic for 1 minute until you can smell it. Add Beef back in and ¼ cup of beef liquid, water or beer.

  6. Stir in mustard and adjust seasoning to taste. Optional to add other herbs or chili flakes at this point. Reserve and let cool for assembly.

Cabbage Wraps

  1. Once the leaves have their center veins removed place in the pot of boiling water with the lid on for 1-2 minutes ( 1 min. longer for tougher cabbage leaves)

  2. Remove and immediately shock to stop the cooking process in the bowl of iced water.

  3. Remove and place on cooling rack to drain and partially air dry.

Assembly

  1. Brush casserole dish with oil or remaining beef fat. Try a 9"x13" or 10" round or a large oval enamelware dish about 2-3" deep, heatproof up to 450F.

  2. Lay each cabbage leaf out on a cutting board or protected surface. Place ⅓-½ cup of prepared filling in center. Fold the long edge over the filling tuck in the ends and roll like a burrito to contain filling in the cabbage wrap.


    blank
  3. Place each roll into the baking dish, each roll should be touching, not a lot of excess space between them.

  4. Once the dish is full, brush the tops of the rolls with more mustard and sprinkle with salt and pepper.

  5. Reserve in the fridge for up to 5 days, freeze in an airtight covered dish for up to 6 months or prepare to bake.

Baking

  1. Preheat oven to 400F. (If pulling prepped casserole from freezer, slack thaw in the fridge overnight to avoid breakage)

  2. Bake for 20 minutes or until browned on top. Serve hot with your favorite mustard sauce or beer cheese sauce. Goes well with WY craft beer!

Serve as an entree with your favorite side dish, as a medley of appetizers, with an egg on it for breakfast or as a quick easy lunch option!

Appetizer, Breakfast, Lunch, Main Course, Side Dish
American, Comfort Food, Eastern European, Peasant
appetizer, aromatic, baked, beef, blanched, cabbage, carrots, casserole, garlic, hearty vegetable, make ahead, meat alternative, onion, peasant dish, penny saving, potato, zero waste
Posted on

Pasta Primavera & Cured Egg Yolks

Cured Egg Yolks

Pasta Primavera

Chef Leah Burback
Fresh vegetables in a creamy sauce for a spring back from winter dish.
Prep Time 10 minutes
Cook Time 20 minutes
Total Time 30 minutes
Course Lunch, Main Course, Salad, sauce, Side Dish
Cuisine American

Equipment

  • large saute pan
  • mesh strainer or colander
  • spatula or whisk

Ingredients
  

  • 2 cups Spring Vegetable medley Try combinations like Cauliflower, Broccoli, Asparagus, Snap Peas, Carrots, Green Beans, Spring Garlic, Beets, etc…
  • 2 Tbsp. cooking oil
  • ½ cup aromatics & herbs ¼ cup sweet onions & garlic ¼ cup parsley, rosemary, thyme, oregano, fennel fronds,
  • 1 cup Chopped Greens use fresh spring tender greens like kale, swiss chard, arugula, spinach, red mustard, dandelion, pea tendrils, carrot greens, etc…
  • 8 oz whole milk or comparable alternative
  • 8 oz cream cheese or your favorite greek yogurt
  • 2 Tbsp butter
  • to taste salt and fresh ground black pepper
  • 2 cups Pasta or try serving over Oat Groats or Baked Potatoes
  • as needed Your favorite Toppings try fresh microgreens, crumbled bacon, toasted nuts/seeds, and perhaps a sprinkle of aged cheese and a bit of our cured egg yolks

Instructions
 

  • Choose a seasonal medley of vegetables. Prepare these into similar bite sized pieces.
    2 cups Spring Vegetable medley
  • Blanching: To preserve the color, flavor and texture of these fresh spring veggies. Prepare a boiling pot of water, use a strainer to cook each kind of the bite-sized veggies until just under done. Immediately strain into an ice bath to halt the cooking process. Remove from the water once cool and mix into a medley, reserve for pasta preparation.
    2 cups Spring Vegetable medley, to taste salt and fresh ground black pepper
  • In a large saute pan over medium-high heat add cooking oil, saute the spring vegetable medley for 1-2 minutes until beginning to brown. Season with a small amount of salt and pepper with each addition of ingredients.
    2 cups Spring Vegetable medley, 2 Tbsp. cooking oil, to taste salt and fresh ground black pepper
  • Add in the aromatics and herbs and saute for another 1-2 minutes until onions begin to sweat. Saute in the chopped greens. Season.
    ½ cup aromatics & herbs, to taste salt and fresh ground black pepper, 1 cup Chopped Greens
  • Pour in the milk and bring up to a simmer(1-2 min), season. Turn heat down to medium low, while stirring add 1 Tbsp at a time of the cream cheese or greek yogurt and the sauce should begin to thicken. Remove from heat and add butter in small pieces at a time to continue thickening the sauce.
    8 oz whole milk, 8 oz cream cheese, 2 Tbsp butter, to taste salt and fresh ground black pepper
  • Once the sauce has thickened pour over your favorite pasta, oat groats, or baked potatoes.
    2 cups Pasta
  • Top with fresh microgreens, crumbled bacon, toasted nuts/seeds, and perhaps a sprinkle of aged cheese and a bit of our cured egg yolks.
    as needed Your favorite Toppings
Keyword 30 minute recipe, aromatic, artichokes, bacon, beets, blanched, broccoli, broccolini, butter, eat the rainbow, fresh herbs, from the garden, green beans, greens, hearty vegetable, herbs, pasta, pasta sauce, primavera, spring

Cured Egg Yolks

Chef Leah Burback
Preserve and use those extra egg yolks for months after the whites have been used. Try these delicious golden orbs grated on pasta, salads, or anything that needs a rich salty bite similar to the best aged cheeses.
Prep Time 15 minutes
Cook Time 7 days
Drying Time 7 days
Total Time 14 days 15 minutes
Course condiment, garnish
Cuisine American, French, Italian

Ingredients
  

  • 12 each whole egg yolks
  • 2 cups kosher salt
  • ½ cup sugar

Instructions
 

  • Mix dry ingredients into a tray or casserole dish that will hold twelve egg yolks side by side (9×13), Reserve half of the mixture to the side.
  • With a spoon or clean egg, create twelve rounded indentations in the curing mixture. Gently place separated yolks into these indentations, take care not to pop the yolk membrane.
  • Sprinkle remaining mixture over the surface of the yolks until covered. Place tray lightly covered on a level surface in a refrigerator for 7 days.
  • After 7 days remove egg yolks and brush off excess curing mixture.
  • Place on a dehydrator tray, or hang individually wraped in cheesecloth, in a dry environment (less than 40% humidity) for one additional week until the yolks have a tough dry cheese like consistency.
  • Once dried properly these can be stored for 2-3 months in an airtight container, 6 months in the fridge.

Notes

Using a fine grater or micro planer, top dishes like pasta, salads, or many others for this bite of rich salty-sweet egg akin to aged cheeses.
Keyword curing, drying, egg yolk, eggs, peasant dish, penny saving, preserve, salt, thrifty
Posted on

Roasted Taco Salsa

blank
blank

Roasted Taco Salsa

Chef Leah Burback
Roasted fresh veggies come together in a simple recipe to pair with the best tacos, corn tortilla chips, and much more. See notes to adjust heat level and check out our demo video!
Prep Time 5 minutes
Cook Time 7 minutes
Total Time 12 minutes
Course Appetizer, condiment, garnish, sauce, Side Dish, Snack
Cuisine Latin American, Mexican
Servings 1 pint

Equipment

  • grill, oven or comal (cast iron roasting pan)

Ingredients
  

  • Oil as needed
  • 2 medium tomatoes roma, san marzano, or thick fleshed heirlooms
  • 2 Serrano chiles see notes for spice level adjustments
  • 2 medium onions
  • 2 medium tomatillos
  • 1/2 tblsp ground cumin
  • 3 sprigs fresh cilantro substitute thyme or oregano if preferred
  • 2 cloves garlic
  • sea salt to taste

Instructions
 

  • Char roast tomatoes, chiles, onion quartered and husked tomatillos
  • Blend together with comin, cilantro, garlic and salt to taste.

Notes

Try this on the grill in the summer.
Add lime or thyme/oregano for flavor.
Substitute a green or red bell pepper for a milder/sweeter version. Substitute a habanero for medium plus heat. Try a combination for more depth of flavor.
Pair with your favorite tortilla chips and guacamole!
Keyword appetizer, burrito, cilantro, dips for chips, fresh herbs, fresh salsa, medium, mild, nacho, pasta sauce, peppers, salsa, spicy, taco, tomatillo, tomato, topping