Posted on

Sous Vide Recipes

cleaning artichokes

Under vacuum. This modern trend of cooking sous vide is a literal translation of the French phrase, under vacuum. Using a tool called an immersion circulator, foods are cooked in a controlled low oxygen environment at a lower temperature for a longer period of time. This method of cooking allows sensitive items like eggs, sauces, fish, meat, and much more to cook at a slower rate. Proteins bind, fats melt slowly and render, fish maintains moisture and flakiness, and meat evenly cooks to desired temperatures. Cooking is a series of controlled chemical reactions that we put together into something delicious and beautiful. Experience a variety of textures, a depth of marinated flavor, and a scientific approach to food preparation.

Eggs: Sous Vide

Chef Leah Burback
These eggs are cooked with the sous vide method to reach the most indulgent textured egg yolk and a white that is cooked yet soft and supple. These eggs are great for benedicts, ramen, pasta, soup, and so much more.
Prep Time 2 minutes
Cook Time 1 hour 30 minutes

Equipment

  • immersion circulator
  • water bath stock pot or heat proof plastic tub
  • heat protected surface

Ingredients
  

  • fresh eggs check for cracks, shell impurities, or thin spots. Farm fresh is best!
  • warm water
  • salt
  • baking soda

Instructions
 

  • Fill a water bath with warm water to the required level for your immersion circulator. Place the bath on a heat-protected surface, affix the immersion circulator in the bath, set temperature to 145°F.
  • Make sure you preheat the water before adding the eggs.
  • Add in a pinch of salt and baking soda with the eggs once preheated.
  • Cook eggs for 60-90 minutes at 145°F until it reaches your desired consistency.
  • Crack the egg over a slotted spoon or strainer to remove the thin outer white. Place the egg gently in soup or over potato hash. The heat from the soup or hollandaise will firm up the inner white just lightly to provide texture.
  • Enjoy the velvety jammy texture of perfectly cooked eggs.

Notes

learn more about sous vide egg cookery 
https://www.seriouseats.com/sous-vide-101-all-about-eggs

Sous Vide Egg Bites

Chef Leah Hays
waterbath eggs that have a silky texture, a great make ahead for those busy morning breakfasts or brinners.
Prep Time 10 minutes
Cook Time 25 minutes
Cooling Time 1 hour
Total Time 1 hour 35 minutes
Course Appetizer, Breakfast, Side Dish, Snack
Cuisine American, French
Servings 6 x8 oz egg cups

Equipment

  • sous vide waterbath setup with immersion circulator

Ingredients
  

  • 1 dozen eggs farm fresh are best
  • cup plain greek yogurt whole milk preferred
  • 3 cloves garlic
  • ¼ cup your favorite toppings see notes for flavor combination ideas

Instructions
 

  • Preheat waterbath for sous vide to 185°F.
  • Prepare 8 oz wide mouth jars by oiling the inside, sanitizing the lids and rings.
  • Layer in your favorite toppings, no higher than the ring line.
  • Blend eggs, yogurt, seasoning, and garlic until smooth and a bit bubbly.
  • Pour egg mixture in each jar up to the ring line.
  • Wipe each jar top with a vinegar dampened towel to remove any oil or egg yolk. This will keep the water out of your jars and allow the lid to seal
  • Affix the lids and rings to all jars and insert into waterbath, once heated, for 25 minutes.
  • Remove jars from waterbath and allow to return to room temperature before chilling with the lid off in the fridge. Once completely cooled, reaffix the lids and rings and save for a quick bite.
  • Re heat from 12 minutes in the oven at 400°F or in the waterbath at 190°F for 15-20 minutes.

Notes

Try flavor combinations like:
Roasted Zucchini and Red Pepper
Roasted Broccoli, Green Onion and Cheddar
Bacon, roasted summer squash, sweet corn and salsa verde with pepperjack
Sausage and Potato hash with Swiss
Spinach Artichoke with Parmesan
Consider using this to use up leftover sides or veggies from a dinner or the last remaining half of a vegetable you didn’t need for a recipe.
Keyword 30 minute recipe, hearty vegetable, make ahead, penny saving, sous vide, thrifty, zero waste
blank

Artichokes with Hollandaise

Chef Leah Burback
Whole fresh artichokes steamed with rich zingy hollandaise sauce. Try this classic fun appetizer as a date night experience!
Prep Time 20 minutes
Cook Time 40 minutes
Total Time 1 hour
Course Appetizer, sauce, Side Dish
Cuisine American, French
Servings 4 people

Equipment

  • blender

Ingredients
  

Hollandaise

  • 10 Tbsp unsalted butter if using salted butter, skip the added salt
  • 3 each egg yolks see how to separate eggs
  • 1 Tbsp lemon juice
  • ½ tsp salt
  • tsp cayenne optional

Artichokes

  • 2 each Fresh artichokes look for bright colors and heavy feel
  • 2 slices Lemon
  • 2 each Bay leaf
  • 2 each Garlic cloves

Instructions
 

Hollandaise Sauce

  • Melt the butter on low in a small pot. Try not to let it boil—you want the moisture in the butter to remain there and not steam away.
  • Add the egg yolks, lemon juice, salt and cayenne into your blender. Blend the egg yolk mixture at a medium to medium high speed until it lightens in color, about 20-30 seconds.
  • Once the yolks have lightened in color, turn the blender down to its lowest setting (if you only have one speed on your blender it will still work), and drizzle in the hot melted butter slowly, while the blender is going. Continue to blend for another couple seconds after the butter is all incorporated. Take care not to blend too high or too long to over thicken.
  • Turn off the blender and taste the sauce. It should be buttery, lemony and just lightly salty. If needed, you can add a little lemon juice or salt to taste.
  • If you want a thinner consistency, add a little warm water. Pulse briefly to incorporate the ingredients one more time.
  • Store until needed in a warm spot and use within an hour or so. Store any unused in an airtight container. Warm over a double boiler and blend on low until smooth once more.

Steamed Artichokes

  • With a pair of kitchen scissors, snip off the tips of the artichoke leaves, they're sharp. With a super-sharp, heavy-duty knife, lop off the top of the artichoke – about 3/4 of an inch worth and cut off the stem at just below the base of the artichoke so that it will sit flat. Remove the bottom row of leaves. Rinse well under cold water.
    cleaning artichokes
  • Fill a large pot with about two inches of water and set in the artichokes, bottom side down. Optional: add a bay leaf, a slice of lemon, and/or a garlic clove. Set on the stove and bring to a boil over high heat, then reduce the temperature on the water to medium, reducing it to a simmer.
    blank
  • Cover and steam the artichokes for about 30-40 minutes, until tender. You can check for doneness by inserting the tip of a knife into the bottom (if it goes in with only a little resistance they're done) or by pulling off a tester leaf (it should come off easily). Remove from water, allow to cool a bit, and serve with warm hollandaise or garlic herb butter.
    blank
Keyword artichokes, date night, hollandaise, mother sauce, steamed, tasting dinner, valentine’s day menu
blank

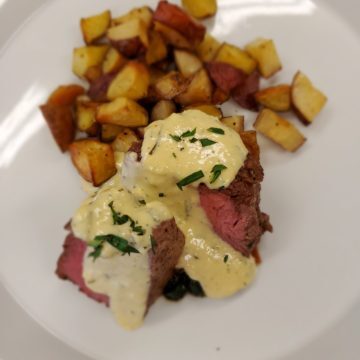
Sous Vide Beef Tenderloin

Leah Burback
a simple method to infuse more flavor and fat into a lean but delicious piece of meat.
Prep Time 15 minutes
Cook Time 2 hours 30 minutes
Sear and Rest Time 30 minutes
Total Time 3 hours 15 minutes
Course Main Course
Cuisine American, French, sous vide
Servings 2 people

Equipment

  • immersion circulator(sous vide setup)
  • Cooking bag (vacuum, silicone, or otherwise sous vide approved bag.)
  • saute pan or grill pan for searing
  • tongs
  • basting spoon

Ingredients
  

  • 2 ea beef tenderloin
  • 6 Tbsp butter or coconut oil, beef fat, or bacon fat
  • 6 cloves garlic, smashed
  • 2 sprigs fresh herbs try rosemary, thyme, sage, basil, oregano
  • salt and peppercorn medley try an applewood smoked sea salt for a smoky indoor flavor without the grill.

Instructions
 

  • Preheat the sous vide (immersion circulator) waterbath to 125°F for Rare- Medium Rare. 133°F for Medium. 140°F Medium Well. 149°F for Well Done.
  • Portion clean, trimmed beef tenderloin into 3 inch tall portions. Tie with cotton butchers twine to hold the round medallion shape while cooking.
  • Season Beef with salt and pepper on all sides.
  • Place tenderloin and all other ingredients in a vacuum bag of your choice, remove most of the air from the bag.
  • Place sealed bag in waterbath, double checking for water leaks, and cook for 2 hours and 30 minutes.
  • Heat a cast iron saute pan or grill to a medium high heat. If doing so indoors on a stove, be sure to use a hood vent to not smoke out the house. Add a small amount of high heat oil to the pan, once heated just before searing.
  • Remove the tenderloin from the bag, careful to reserve the aromatics, butter and juices inside. Sear beef on two flat sides until deep golden brown and carmelized.
  • If searing in a sauté pan, add reserved juices and allow milk solids in the butter to brown. Baste meat by spooning buttery juices over the medallions until moistened.
    blank
  • Remove meat and crispy garlic cloves from the pan, cut twine to remove from meat, and let rest for 15 minutes covered in foil.
  • Slice, sprinkle with salt, and serve with your favorite seasonal vegetable sides and include the carmelized garlic for sweet punch of flavor.

Notes

Consider adding other seasonal flavors or spice this up with chile flakes. A great south american alternative cooking marinade would be a chimichurri sauce. 
Try pairing with sides like roasted root vegetable medley, fresh seasonal salads, or your favorite warm grains. 
Keyword aromatic, beef, butter, fresh herbs, reverse sear, sous vide
Posted on

Asian Veggie Namkeen Recipes

Lettuce Wraps

Namkeen is an Urdu word for a savory or salty light meal or tidbit. Nibble your way through more veggies! These recipes use some of the most well-known vegetables in the fridge, in a different way. Use simple techniques to really bring the flavor out of leftover shredded cabbage, carrots, green onions, cauliflower and so much more.

Yachaejeon or Pajeon (Korean Vegetable Pancake)

Use the medley of vegetables that are ready in the spring to make a delicious side dish, snack, or lunch. These hearty pancakes will soon become a favorite quick recipe.
Prep Time 25 minutes
Cook Time 5 minutes
Total Time 30 minutes
Course Appetizer, Lunch, Side Dish, Snack, tasting dinner
Cuisine American, Asian, Korean
Servings 4 servings

Equipment

  • griddle or saute pan

Ingredients
  

  • ½ cup all-purpose flour try red spring, einkorn, or white sonora
  • ½ cup potato starch or 1/4 cup each white rice flour and cornstarch
  • ¾ tsp salt and to taste
  • ½ tsp baking powder
  • ¾ cup ice water
  • 1 each large egg
  • ¼ cup finely chopped kimchi or sauerkraut
  • 4 cups finely chopped or grated spring veggies carrots, cabbage, radish, onion, kale, bell pepper, leeks, or any combination
  • 4 Green Onions cut into 2-inch-long sections and thinly sliced lengthwise
  • 2 Tbsp Coconut or Sesame oil plus more as needed

FOR THE DIPPING SAUCE:

  • 3 Tbsp soy sauce also try liquid aminos or coco aminos
  • 2 tsp rice wine vinegar
  • 1 tsp finely grated fresh ginger or garlic
  • ½ tsp sesame oil
  • 1 Pinch granulated sugar or drizzle of honey

Instructions
 

Pancake Batter

  • In a large bowl, whisk together flour, starch, salt and baking powder.
  • Combine water, egg, and kimchi. Whisk the kimchi mixture into the flour mixture, and whisk until smooth.
  • Fold in vegetables and about ¾ of the Green Onions. (Save the rest for garnish.)
  • In a large nonstick griddle to medium heat, heat 2 tablespoons of oil.
    Scoop 2 oz portions of batter onto the skillet, as many as will fit while not touching, flatten, and fry until dark golden on the bottom, about 2 to 3 minutes.
  • Flip and continue to fry until the other side is browned, 2 to 3 minutes. Transfer to a paper towel-lined plate and sprinkle with a little more salt. Continue with remaining batter.

Dipping Sauce

  • In a small bowl, stir together soy sauce, vinegar, ginger or garlic (if using), sesame oil, and sugar. Sprinkle sliced green onions over pancakes, and serve with dipping sauce on the side.
Keyword appetizer, aromatic, cabbage, carrots, hearty vegetable, onion, pancake, sauce
Lettuce Wraps

Asian Lettuce Wraps

Chef Leah Burback
A traditional meat and veggie combination seasoned with soy, oyster, and fish sauces.
Prep Time 20 minutes
Cook Time 20 minutes
Total Time 40 minutes
Course Appetizer, Side Dish
Cuisine Thai
Servings 12 wraps

Ingredients
  

  • ½ lb your choice of meat diced chicken, ground beef, ground turkey, ground wild game
  • 3 cups cauliflower, riced
  • 1 cup broccoli stalks, grated
  • 1 cup carrots, diced
  • 1 cup cabbage, diced red, chinese, or bok choy
  • 1 Tbsp fresh ginger, minced
  • 3 cloves garlic, rough chopped
  • 2 Tbsp fish sauce
  • 1 oz oyster sauce
  • 1 oz soy sauce
  • 2 Tbsp chili garlic sauce i.e. sambal, sriracha,
  • 1 oz rice vinegar
  • 1 oz mirin (rice cooking wine)
  • 1 Tbsp cornstarch
  • 4 each green onions, sliced white and green
  • to taste salt and pepper
  • 1 head Bibb or buttercrunch living lettuce
  • as desired radish or spicy salad microgreens

Instructions
 

Veggie and Meat Filling

  • Brown your meat of choice in a large saucepan, season lightly with salt and pepper to start infusing flavor. Once cooked through, reserve to let cool on the side.
  • Saute the cauliflower and broccoli until softened, add in carrots and cabbage until slightly carmelized. Add in ginger, garlic and saute until nice and aromatic. Season slightly with salt and pepper.
  • In a small container combine all the sauce liquids and cornstarch, mix well.
  • Fold in the browned meat to the veggie mixture and add the sauce on medium low heat.
    Taste check when bubbly and thickened, stirring frequently. Taste check for seasoning and reserve for service.

Wrap Assembly

  • For family style service wash and seperate bibb lettuce leaves and place on the table next to the filling with a serving spoon. Each wrap should hold about ¼-⅓ cup of filling and additional toppings.

Notes

Consider serving with Microgreens, sliced radishes, water chestnuts, crushed peanuts or sunflower seeds, pickled vegetables, or fermented hot sauces.
If you are looking for a more traditional thai flavor, consider adding a couple Tbsp of tamarind paste, this adds a unique sour and sweet flavor. This is specific to thai or hispanic foods.
Keyword appetizer, lettuce wraps
blank

Pickled Radishes and Leeks

Chef Leah Burback
Pickle bright colored radishes and get a lighter onion flavor with strips of leeks. Use as a topping for tacos, rice bowls, or cheese plate.
Prep Time 20 minutes
Cook Time 5 minutes
Total Time 25 minutes
Course condiment, garnish, Salad, Snack, tasting dinner
Cuisine American, Asian, Latin American
Servings 4 cups

Equipment

  • mandolin (slicer)

Ingredients
  

  • 2 bunches radishes breakfast, daikon, watermelon radishes or a combination
  • 1 whole leek Trim the dark green leaves and root end and reserve for leftovers stock!
  • 1 quart purified water
  • 1 Tbsp sea salt
  • 1 tsp sugar or honey

Instructions
 

  • Slice radishes and leeks into wheel shapes of even thickness. Wash in cold water well in ensure no grit remains.
  • Heat half of the water and add salt and sweetener of choice to dissolve fully. Add in remaining cold water to reduce temperature.
  • Pack veggies into one quart jar. cover with brine, weight down veggies to keep submersed if necessary. Cover with airlock lid or open once per day over the next several days.
  • Ferment for 7-10 days until the color starts to noticeably change. Test for texture and flavor, make sure the brine keeps the veggies covered during fermenting.
  • Quick Pickle Method: Heat 3/4 water until boiling, add in salt and sweetener, and 1/2 cup apple cider vinegar. Pour over veggies and let sit until room temperature, serve immediately or cool completely with lid off, use within two weeks.
Keyword 30 minute recipe, condiments, fermentables, garnish, penny saving, pickles, thrifty
Posted on

Your Cinco De Mayo Menu

blank

The 5th of May has become a day of celebration in the United States and primarily in the City of Puebla. This is not Mexican Independence day but it was important in the history of our countries’ relationship. We can celebrate the local fresh ingredients the same way food plays a huge role in true Mexican culture. Try these tacos, slaws, rice, and so much more to experience the flavor and culture of some of those we share this continent with. Salud!

blank

Beef Barbacoa Tacos

Chef Leah Burback
Slow cooker recipe that can pair with so many of your fresh garden veggies!
Prep Time 15 minutes
Cook Time 2 hours
Optional: Marinating or Soaking 8 hours
Total Time 10 hours 15 minutes
Course Lunch, Main Course
Cuisine American, Latin American, Mexican

Equipment

  • digital pressure cooker or slow cooker

Ingredients
  

Beef Barbacoa

  • 5 each garlic cloves, smashed
  • 1 whole yellow onion, quartered
  • 3 each dried chiles i.e. chipotles, anchos, guajillos, or pasillas
  • herbs mexican oregano, cilantro stems, thyme
  • 2 Tbsp cumin ground
  • 2 Tbsp Coriander whole
  • ¼ salt
  • 1 Tbsp black peppercorns
  • 4 lb beef round or chuck roast
  • 1 cup water or stock

Bean Salad

  • 1 cup dried bean medley indian woman yellow beans, flagolet, red/black calypso and many more options
  • ½ cup carrots, small diced
  • ½ cup onions, small diced
  • 1 cup orange basil garlic vinaigrette
  • ¼ cup salt
  • ½ cup fresh herbs, rough chopped

Radish Slaw

  • 1 cup spring radishes daikon, watermelon, breakfast, etc
  • 1 cup carrots
  • 2 cups cabbage
  • 1 cup dressing cilantro lime, basil garlic, or creamy citrus onion

Chimichurri

  • 1 cup cilantro
  • 1 cup parsley
  • ½ cup garlic cloves
  • 1 cup olive oil
  • ¼ cup apple cider vinegar
  • 1 Tbsp each salt and pepper
  • ½ Tbsp red chili flake optional

Instructions
 

Beef Barbacoa

  • Sear all sides of the chuck roast until browned.
  • Place all remaining ingredients in the pot. For the pressure cooker, bring up to temperature on high pressure for 1 hour. For the slow cooker, turn on high until up to a simmer, reduce to low heat for a 6-8 hour cook, covered.
  • Once complete, remove the meat from the cooking liquid and shred.
  • Strain liquid and add some back to the meat to keep moist. Reserve for tacos.

Bean Salad

  • Soak dried beans overnight in cool filtered water. Drain off the soaking liquid and place the soaked beans in the cooking pot. Cover the beans with new cooking liquid, oil, and herbs. DO NOT SALT UNTIL COOKED, salt hardens the outer shells of the beans and prevents them from cooking through completely.
  • Cook beans in a pressure cooker for 15-20 minutes on high pressure. Test for doneness and strain off the pot liquor (bean cooking liquid). Toss in half of the dressing and place on a tray to cool completely.
  • Once cool add in the vegetables and the remaining dressing. Serve cold with tacos and so much more.

Radish Slaw

  • Toss julienned vegetables in the dressing and let marinade for at least 1 hour.

Chimichurri

  • Crush all ingredients together by mortar and pestle, pulsing in a blender or food processor, or chopping by hand while gradually adding small amounts of oil.
  • Test seasoning and chill until assembly.

Assembly

  • Toast 6" tortillas 1 minute per side. Hold in tortilla warmer or foil pouch until ready.
  • Fill the tortillas with ¼ cup of shredded barbacoa, top with 2 Tbsp of garden slaw, and 1-2 Tbsp of chimichurri to taste.
  • Also try garnishing with microgreens, cheese, sour cream, or pickled vegetables
  • Pair with the bean salad, spanish rice, grilled corn, or snap peas depending upon the season.
Keyword beef, braising, cabbage, carrots, taco
blank

Spanish Rice

Chef Leah Burback
Traditional pot rice with a no stir method using spring veggies, canned or overripe tomatoes with juice, onions and garlic. This makes the perfect accompaniment to any hispanic or latin american dish.
Prep Time 15 minutes
Cook Time 30 minutes
Total Time 45 minutes
Course Side Dish
Cuisine American, Latin American, Mexican, Peasant
Servings 4 people

Equipment

  • heavy bottom soup pot with lid

Ingredients
  

  • cups long grain rice or try oat groats with increased time and water ratio
  • ¼ cup oil or ghee
  • cups english peas washed and shucked, or snap peas 1" pieces
  • cups carrots medium diced ½"
  • 2 cups yellow onion medium diced ½"
  • 3 cloves garlic rough chopped
  • 16 oz diced tomatoes with juice canned or overripe fresh tomatoes
  • 2 cups vegetable or chicken stock low sodium and/or homemade
  • 1 Tbsp salt

Instructions
 

  • Heat a pot at least 4 quarts to medium heat on the stove top. Add oil or ghee and rice. Toast rice until opaque and a toasty smell appears, not browned. Stirring frequently.
  • Add in Carrots and sweat. Add onions and garlic and sweat until translucent. Fold in peas and tomatoes until juice cooks down slightly from tomatoes.
  • Add in stock and bring back up to a boil and reduce to a simmer. Season with salt, stir, cover, and leave to cook for approximately 22 minutes on low heat.
  • This is best done with a glass lidded pot if you are impatient, do not lift the lid to check the doneness until close to done. Every time the lid is lifted, liquid that should be absorbed into the rice is evaporated.
  • Check for doneness and fluff rice. Adjust seasoning if need be. Serve with tacos, steak, burritos or any of your other south of the border favorites.
Keyword 30 minute recipe, aromatic, rice
blank

Marinated Squash and Tomato Salad

Chef Leah Burback
Try this raw summer squash salad with a method that removes the excess moisture and replaces it will flavorful dressing!
Prep Time 30 minutes
Total Time 30 minutes
Course Appetizer, Salad, Side Dish, Snack
Cuisine European, Latin American
Servings 4 servings

Ingredients
  

  • 2 lb Fresh Squash Medley Zucchini, Summer Squash, Crookneck, Patty Pan, Sunburst, Young Luffa
  • 2 Tbsp kosher salt
  • 1 pint cherry tomatoes
  • ½ cup mustard vinaigrette
  • ½ cup fresh herbs oregano, basil, parsley, tarragon
  • 1 cup feta cheese chunks

Instructions
 

  • Cut the squash into quarter circle slices ½" thick. Toss in salt and place in a colander to drain for 15 minutes. This is called degorging, to remove excess water and soften the squash structure.
  • Toss the remaining ingredients in a large bowl together.
  • Rinse the degorged squash in running water, drain and pat dry. Add to the dressed ingredients and refrigerate, allowing to meld flavors together for at least 30 minutes.
  • Serve as a side dish or with grilled meat as a main course.
Keyword 30 minute recipe, appetizer, chopped salad, hearty vegetable, marinade, salad, squash, tomatoes, vinaigrette, zucchini
Posted on

Gnocchi, Meatballs, and Pesto

blank

Try this homemade pasta made from all local ingredients! Use potatoes, farm-fresh eggs, and your choice of flour to create delicious fluffy pillows. Toss these pillows in rich herbaceous pesto made with WY-grown pumpkin or sunflower seeds and pair them with an unctuous meatball for a complete indulgent meal.

blank

Potato Gnocchi

Chef Leah Burback
Fluffy pasta pillows made with baked mashed potatoes!
Prep Time 30 minutes
Cook Time 1 hour
Resting Time 1 hour
Total Time 2 hours 30 minutes
Course Appetizer, Main Course, Side Dish
Cuisine American, Italian
Servings 4 people

Equipment

  • kitchen scale
  • spider strainer or colander

Ingredients
  

  • 500 g Potato
  • 50 g unsalted butter
  • 10 g salt
  • 4 each egg yolks
  • 125 g flour try WHG White Sonora or GF Harvest Oat Flour for GF

Instructions
 

  • Bake potatoes, skin-on, oiled salt and peppered, pricked with a fork at 350F for 45 min -1 hr. remove from oven once inserted knife, removes cleanly. Cover in foil and let cool just enough to handle. Peel potatoes and add to stand mixer immediately, still warm is important.
  • Add butter and salt to warm peeled potatoes and mash together with stand mixer or preferred mashing method, this should to too hot to do by hand.
  • Once well blended and without chunks, add in egg yolks and mix until together without stripes. (If you wish to premake and save, wrap this mixture and store in an airtight wrap or vaccuum bag in the fridge or freezer until ready to make.)
  • When mixture is cool to the touch, add in flour and knead until it forms a soft bouncy cohesive dough.
  • Wrap in plastic and rest in the fridge for at least one hour.
  • Remove from fridge and flour the dough, well. Split into four sections and roll out each section into ¾" cylinders. Cut into ½" pieces and flour well.
  • Cook in salted boiling water in handful sized batches, stirring frequently until the pasta floats to the surface. Strain out and toss in melted butter/oil, or sauce and serve immediately.
  • Save extra portions tossed in oil and chilled. Saute your favorite veggies and greens in garlic butter, add gnocchi until lightly browned to reheat. try tossing in Squash Sauce, Zero Waste Greens Pesto, or a Fall Vegetable Ragout.
Keyword appetizer, pasta, peasant dish, penny saving, potato, thrifty
blank

Pork Meatballs

Chef Leah Burback
Simple Italian-style meatballs that pair with your favorite sauce as an appetizer or main dish.
Prep Time 20 minutes
Cook Time 20 minutes
Total Time 40 minutes
Course Appetizer, Lunch, Main Course
Cuisine American, Italian
Servings 6 people

Equipment

  • portion scoop
  • oven, grill, or smoker

Ingredients
  

  • 3 lb Ground Pork also try pork sausage and adjust seasoning accordingly
  • ½ each Onion, small diced
  • 4 each Garlic Cloves, smashed & rough chopped
  • 2 each whole eggs
  • ½ cup rolled oats
  • 2 Tbsp Ground Fennel
  • 2 Tbsp Italian Seasoning
  • 1 Tbsp red pepper flakes adjust to your spice preference
  • 2 Tbsp salt consider adding a smoked salt if baking.
  • 1 Tbsp crackd black pepper

Instructions
 

  • Mix together all ingredients by hand just until blended well. Do not use a mixer or food processor as this will change the fat and protein structure of the meat.
  • Cover and chill for 15 minutes.
  • Portion into 2 oz sized spheres and place on a lightly greased tray.
  • Sear on the grill or in a saute pan if desired. Bake or smoke at 350 for 20 minutes until just done all the way through. Take care not to overcook as the meatball will dry out.
  • Serve with your favorite sauce and Italian-style starch as an entree.
Keyword 30 minute recipe, appetizer, eggs, Sausage
Pesto

Zero Waste Greens Pesto

Chef Leah Hays
Prep Time 20 minutes
Cook Time 5 minutes
Total Time 25 minutes
Course Appetizer, condiment, garnish, sauce
Cuisine American, Italian
Servings 1 quart

Equipment

  • blender or mortar and pestle

Ingredients
  

  • 2 gallon bags of cleaned destemmed Carrot Tops Kale, Broccoli Greens (Any combination)
  • 4 cups Arugula
  • 2 cups Basil leaves
  • 1 cup Parsley leaves
  • ¾ cup Sunflower butter or 1/3 cup pumpkin seeds
  • 2-3 T Garlic cloves smashed
  • 2 T Lemon juice or apple cider vinegar
  • 2 T Honey or agave
  • 2 cups Olive oil
  • to taste Salt and black pepper
  • ½ cup Parmesan Cheese Optional:

Instructions
 

  • Tougher greens (carrot tops, kale, broccoli…) need to be placed in a strainer and boiled in salted water for 3-5 minutes and chilled in an ice water bath immediately. Remove once cool directly into a blender or food processor.
  • Add all other ingredients except Olive oil (and cheese if adding). For pesto with a chunky texture, pulse mixture while gradually adding oil ¼ cup at a time until combined. For a smooth texture add ½ cup of oil and turn on blender or immersion blender and drizzle remaining oil slowly to emulsify.
  • If adding, fold in shredded cheese and pulse to desired consistency. Add 1 T salt and pepper and allow to meld for 5 minutes.
  • Taste check and add salt and pepper as needed. Also check the balance of sweetness, acidity, and mouthfeel of the oil with the texture.
  • Store up to 3 weeks in refrigerator or water bath can and seal for 10 minutes for shelf stable storage up to 1 year(without dairy products or nut oils)

Notes

Swirl with mascarpone cheese and serve with toasted baguette as an appetizer.
Toss with fresh cooked pasta and add a small amount of pasta cooking water.
Use as a pizza sauce with fresh cherry tomatoes and a fresh mozzarella.
Toss salad greens for a lovely salad.
Marinade chicken or steak before grilling.
Keyword 30 minute recipe, aromatic, dips for chips, fresh herbs, garlic, greens, pasta sauce, penny saving, salad greens, zero waste
Posted on

Your St. Patrick’s Menu

blank

Try some Celtic-American favorites for this cheery March holiday! Learn about a bit of the history that brings this food meaning.

We have included some of our favorite recipes for a braised dish of Coddle, Irish Brown Bread, and Cottage Pie with Colcannon. Coddle in the Dublin style is a sausage, bacon, root vegetable, and cabbage slow braise that can be made ahead of time to enjoy after a hard day’s work. Brown bread is a lightly sweet molasses quick bread to help absorb all the rich broth or sauce from any good comfort food. Cottage Pie or Shepherd’s Pie is the most well-known Celtic style recipe that has been used and adapted by farmers, ranchers, shepherds of all kinds. The name of the pie is traditionally based on the meat protein used and who tends to these animals during the harsh March weather.

May you share these recipes with those you care about and send them out into the world with blessings of a warm hearth, a satisfied stomach, and nutrients to fuel their springtime travels.

blank

Dublin Coddle

Chef Leah Burback
Slow cooked irish braise with potatoes, cabbage, bacon/sausage, and onions. A nice one pot recipe to warm you and your family on the coldest early spring nights.
Prep Time 25 minutes
Cook Time 1 hour 30 minutes
Assembly 5 minutes
Total Time 2 hours 5 minutes
Course Main Course, Soup, Stew
Cuisine American, Celtic, Irish, Peasant
Servings 6 people

Equipment

  • dutch oven or oven safe soup pot with lid

Ingredients
  

  • 10 strips Applewood smoked bacon cut into 1-inch pieces thick-cut about ½-¾ lb.
  • 1 ¾ pound about 5 quality pork sausages
  • 4 each small yellow onions sliced
  • 1 cup cabbage cut into 2" squares
  • 1 cup carrots large dice
  • 3 lb. russet potatoes roughly peeled and diced into large bite-size pieces
  • 2 Tbsp fresh parsley minced
  • to taste kosher salt and black pepper
  • 2 cups chicken stock low-sodium

Instructions
 

  • Preheat oven to 300 degrees.
  • Place bacon into a 5-quart Dutch oven and heat over medium to medium-low until cooked and crispy, about 18-20 minutes. Using a slotted spoon, transfer the bacon to a paper towel lined plate.
  • Sear sausages for 3 to 4 minutes on both sides. Transfer to a cutting board and slice into thirds.
  • Remove the pot from the burner and layer, onions with a pinch of salt and parsley, bacon, sausages, more parsley, potatoes, cabbage, carrots, and then a few pinches of both salt and pepper and the remaining minced parsley.
  • Pour stock over top, cover and place back onto burner. Bring liquid up to a boil before covering and transferring pot to preheated oven for 1 hour and 30 minutes or until the potatoes are fork tender. Adjust seasoning to taste.
  • Remove and ladle into bowls with a little of the broth and serve immediately with sourdough or brown bread.
Keyword bacon, braising, cabbage, Dublin, potato, Sausage, Slow Cooked, Stew
blank

Irish Brown Bread

Chef Leah Burback
Try a traditional recipe with Wyoming grains from Wyoming Heritage Grains and GF Harvest.
Prep Time 15 minutes
Cook Time 40 minutes
Total Time 55 minutes
Course Bread, Side Dish
Cuisine American, Celtic, Irish, Peasant
Servings 1 loaf

Ingredients
  

  • 2 cups Red Spring Flour Wyoming Heritage Grains
  • 2 cups Gazelle Rye Flour Wyoming Heritage Grains
  • 1 ½ tsp salt
  • ½ cup Rolled Oats GF Harvest
  • 1 tsp baking soda
  • 1 ¾ cups buttermilk
  • 2 Tbsp molasses

Instructions
 

  • Preheat oven to 450°F.
  • In a large bowl combine the dry ingredients: both flours, oats, salt and baking soda. Mix thoroughly all the dry ingredients.
  • Whisk buttermilk and molasses. Make a well in the center of the dry ingredients. Pour in the buttermilk mixture.
  • Using a fork or spatula, stir gradually until combined.
  • With floured hands, knead into a ball.
  • Shape the dough into a circle and place on a lined baking sheet. Press flat to about 2 inches thick. It will form a round loaf about 8 inches in diameter.
  • With a sharp knife cut a deep cross on top of the ball.
  • Bake in the preheated oven for 15 minutes at 450°F. Reduce the heat to 400°F then bake for an additional 20-25 minutes or until the bottom of the bread sounds hollow when tapped.
Keyword ancient grains, baked, bread, oats, quick bread
blank

Cottage Pie with Colcannon

Chef Leah Burback
A combination of two traditional irish recipes. Try ground lamb for the shepherd's pie variation!
Prep Time 15 minutes
Cook Time 45 minutes
Assembly & Layering 10 minutes
Total Time 1 hour 10 minutes
Course Main Course, Side Dish
Cuisine American, Celtic, Irish, Peasant
Servings 1 9×13 casserole dish

Ingredients
  

Cottage Pie Meat Filling

  • pounds ground beef, lean ground lamb (shepherd's) or venison (hunter's)
  • ¼ cup diced onions
  • 2 each small diced carrots
  • ½ cup beets cleaned, trimmed and diced try a combination for increased flavor gold, red, chiogga
  • 1 cup diced celery
  • 1 Tbsp minced garlic
  • ½ cup dry red wine
  • 1 Tbsp tomato paste
  • 2 cups beef broth
  • 2 Tbsp worcestershire sauce
  • 2 sprigs fresh thyme also add rosemary to increase herbaceous flavor
  • 2 each bay leaves
  • prepared colcannon recipe follows

Colcannon

  • 4 each potatoes 2 to 2 ½ pounds, peeled and cut into large chunks
  • Salt
  • 5-6 Tbsp unsalted irish butter with more butter for serving
  • 3 cups chopped kale, lightly packed cabbage, chard, or other leafy brassica greens
  • 3 each green onions including the green onion greens, minced (about ½ cup)
  • 1 cup milk or cream
  • 2 each eggs

Instructions
 

  • Preheat oven to 350 degrees F.

Meat Filling Directions

  • In a large skillet, brown the ground beef until no longer pink; then add the onions, carrots, beets, celery and garlic.
  • Allow the vegetables to soften for 2-3 minutes; deglaze the pan with the red wine to get all that lovely caramelization, let the alcohol cook off then add the tomato paste and stir in well.
  • Add the remaining meat filling ingredients. Mix well and allow to cook over medium heat until most of the liquid has been absorbed; approximately 15-20 minutes. Prepare colcannon while simmering.

Colcannon Directions

  • Put the potatoes in a medium pot and cover with cold water by at least an inch. Add 2 tablespoons of salt, and bring to a boil.
  • Boil until the potatoes are fork tender, 15 to 20 minutes. Drain in a colander.
  • Return the pot to the stove and set over medium-high heat. Melt the butter in the pot and once it’s hot, add the greens.
  • Cook the greens for 3-4 minutes, or until they are wilted and have given off some of their water.
  • Add the green onions and cook 1 minute more.
  • Pour in the milk or cream, mix well, and add the potatoes. Reduce the heat to medium.
  • Use a fork or potato masher and mash the potatoes, mixing them up with the greens. For a smoother texture use a paddle attachment on a stand mixer, this will increase the fluffiness as well.
  • Add salt to taste, allow to cool slightly and whip in a slightly beaten eggs if using for cottage pie topping.

Assembly and Baking Directions

  • Remove the thyme and bay leaves from the meat filling and place in an oven safe casserole dish, 9×13 or similar size;
  • Then top with prepared colcannon. this can be spread, scooped, or piped on top. If piping be sure to use a larger size star tip to reduce clogging from additions to mashed potato topping. Option to brush the top with egg wash as well for darkened color.
  • Bake for 30 minutes until golden brown on top and bubbly and thick underneath.
    blank
  • Serve with brown bread and your favorite irish stout beer!
Keyword beef, beetroot, beets, carrots, casserole, hearty vegetable, lamb, make ahead, peasant dish, potato
Posted on

Zero Waste Greens Pesto

Pesto
Pesto

Zero Waste Greens Pesto

Chef Leah Hays
Prep Time 20 minutes
Cook Time 5 minutes
Total Time 25 minutes
Course Appetizer, condiment, garnish, sauce
Cuisine American, Italian
Servings 1 quart

Equipment

  • blender or mortar and pestle

Ingredients
  

  • 2 gallon bags of cleaned destemmed Carrot Tops Kale, Broccoli Greens (Any combination)
  • 4 cups Arugula
  • 2 cups Basil leaves
  • 1 cup Parsley leaves
  • ¾ cup Sunflower butter or 1/3 cup pumpkin seeds
  • 2-3 T Garlic cloves smashed
  • 2 T Lemon juice or apple cider vinegar
  • 2 T Honey or agave
  • 2 cups Olive oil
  • to taste Salt and black pepper
  • ½ cup Parmesan Cheese Optional:

Instructions
 

  • Tougher greens (carrot tops, kale, broccoli…) need to be placed in a strainer and boiled in salted water for 3-5 minutes and chilled in an ice water bath immediately. Remove once cool directly into a blender or food processor.
  • Add all other ingredients except Olive oil (and cheese if adding). For pesto with a chunky texture, pulse mixture while gradually adding oil ¼ cup at a time until combined. For a smooth texture add ½ cup of oil and turn on blender or immersion blender and drizzle remaining oil slowly to emulsify.
  • If adding, fold in shredded cheese and pulse to desired consistency. Add 1 T salt and pepper and allow to meld for 5 minutes.
  • Taste check and add salt and pepper as needed. Also check the balance of sweetness, acidity, and mouthfeel of the oil with the texture.
  • Store up to 3 weeks in refrigerator or water bath can and seal for 10 minutes for shelf stable storage up to 1 year(without dairy products or nut oils)

Notes

Swirl with mascarpone cheese and serve with toasted baguette as an appetizer.
Toss with fresh cooked pasta and add a small amount of pasta cooking water.
Use as a pizza sauce with fresh cherry tomatoes and a fresh mozzarella.
Toss salad greens for a lovely salad.
Marinade chicken or steak before grilling.
Keyword 30 minute recipe, aromatic, dips for chips, fresh herbs, garlic, greens, pasta sauce, penny saving, salad greens, zero waste
Posted on

Artichokes with Hollandaise

cleaning artichokes
blank

Artichokes with Hollandaise

Chef Leah Burback
Whole fresh artichokes steamed with rich zingy hollandaise sauce. Try this classic fun appetizer as a date night experience!
Prep Time 20 minutes
Cook Time 40 minutes
Total Time 1 hour
Course Appetizer, sauce, Side Dish
Cuisine American, French
Servings 4 people

Equipment

  • blender

Ingredients
  

Hollandaise

  • 10 Tbsp unsalted butter if using salted butter, skip the added salt
  • 3 each egg yolks see how to separate eggs
  • 1 Tbsp lemon juice
  • ½ tsp salt
  • tsp cayenne optional

Artichokes

  • 2 each Fresh artichokes look for bright colors and heavy feel
  • 2 slices Lemon
  • 2 each Bay leaf
  • 2 each Garlic cloves

Instructions
 

Hollandaise Sauce

  • Melt the butter on low in a small pot. Try not to let it boil—you want the moisture in the butter to remain there and not steam away.
  • Add the egg yolks, lemon juice, salt and cayenne into your blender. Blend the egg yolk mixture at a medium to medium high speed until it lightens in color, about 20-30 seconds.
  • Once the yolks have lightened in color, turn the blender down to its lowest setting (if you only have one speed on your blender it will still work), and drizzle in the hot melted butter slowly, while the blender is going. Continue to blend for another couple seconds after the butter is all incorporated. Take care not to blend too high or too long to over thicken.
  • Turn off the blender and taste the sauce. It should be buttery, lemony and just lightly salty. If needed, you can add a little lemon juice or salt to taste.
  • If you want a thinner consistency, add a little warm water. Pulse briefly to incorporate the ingredients one more time.
  • Store until needed in a warm spot and use within an hour or so. Store any unused in an airtight container. Warm over a double boiler and blend on low until smooth once more.

Steamed Artichokes

  • With a pair of kitchen scissors, snip off the tips of the artichoke leaves, they're sharp. With a super-sharp, heavy-duty knife, lop off the top of the artichoke – about 3/4 of an inch worth and cut off the stem at just below the base of the artichoke so that it will sit flat. Remove the bottom row of leaves. Rinse well under cold water.
    cleaning artichokes
  • Fill a large pot with about two inches of water and set in the artichokes, bottom side down. Optional: add a bay leaf, a slice of lemon, and/or a garlic clove. Set on the stove and bring to a boil over high heat, then reduce the temperature on the water to medium, reducing it to a simmer.
    blank
  • Cover and steam the artichokes for about 30-40 minutes, until tender. You can check for doneness by inserting the tip of a knife into the bottom (if it goes in with only a little resistance they're done) or by pulling off a tester leaf (it should come off easily). Remove from water, allow to cool a bit, and serve with warm hollandaise or garlic herb butter.
    blank
Keyword artichokes, date night, hollandaise, mother sauce, steamed, tasting dinner, valentine’s day menu
Posted on

Southern Braised Greens

blank
blank

Southern Braised Greens

Chef Leah Burback
Braised greens have been traditionally made more approachable by the use of butter, bacon, brown sugar, garlic, vinegar, and spice. This recipe uses collard greens, but they are one of many tough bitter greens that contain great nutritional value while being tough to swallow. Enjoy this decadent braised recipe with your favorite southern entrees.
Prep Time 15 minutes
Cook Time 1 hour
Total Time 1 hour 15 minutes
Course Appetizer, Breakfast, condiment, Side Dish, Snack
Cuisine American, Comfort Food, Southern Soul
Servings 6 servings

Equipment

  • heavy bottomed wide stock pot (or rondeau)

Ingredients
  

  • 2 oz Butter or ghee (add 50% more if substituting for mushrooms)
  • ½ lb bacon or mushroms
  • 1 cup yellow onions diced
  • cup garlic rough chopped
  • 1 Tbsp red chile flakes adjust to preference
  • ¼ cup local raw honey
  • 1 Tbsp molasses, blackstrap
  • ¼ cup apple cider vinegar
  • 4 cups collard greens washed, destemmed, chopped into 2" squares (try other greens like beet, swiss chard, broccoli, kale, or a combination)
  • 1 quart stock or broth low sodium chicken or pork for meat, mushroom or veggie for meatless
  • to taste salt and black pepper

Instructions
 

  • Preheat braising pot(rondeau) over medium heat. Add butter and bacon and saute until the fat renders out of the bacon and starts to get crispy. (or until mushrooms are browned)
  • Add in onions, garlic, and red chile flakes. Sauté until translucent and just starting to caramelize.
  • Stir in honey and molasses until thick and bubbly. Deglaze with apple cider vinegar and reduce down.
  • Start adding greens in large handfuls with 1 cup of stock and stir frequently. Add a new handful of greens with stock until all of both ingredients have been wilted and added.
  • Reduce to a low simmer and cook for at least 30 minutes and the liquid has created a syrup like sauce.
  • Check tenderness and adjust seasoning with salt and black pepper to taste. Greens should not be tough to chew when the braising process is complete.

Notes

Try large kale leaves, broccoli greens, swiss chard leaves and stems, beet greens and stems, or squash leaves. This recipe will help break down greens high in vitamin k and a. Please use caution with foods high in vitamin k as they interfere with blood-thinning medication.
Keyword bacon, braising, butter, eat the rainbow, garlic, peasant dish, Slow Cooked, zero waste
Posted on

Let Food Be Thy Medicine

blank

So proclaimed Hippocrates, but what does that mean in everyday life? Explore a handful of awesome foods you can add to your palate today and learn how they benefit your health!

Mother Earth News | Originally published in April of 2018 | By Laura Berlage, North Star Homestead Farms

Dan Buettner, in his recent TED talk that shared lessons learned in the study of vibrant centurions, noted that longevity is 10% genetics and 90% lifestyle choices.  Second on his list after meaningful social connections was “Eat Wisely.”

Of course, we’ve all heard the message that we need to pay attention to what we eat, in tandem with leading an active lifestyle, but what does that actually mean in an everyday practice?  How can we get to that place where the Greek physician Hippocrates’s admonition of “Let food be thy medicine and medicine be thy food” has a real and profound impact on our own lives?

The answer is not as daunting or complex as it may seem.  “Eat food, not too much, mostly plants” says renowned food expert and journalist Michael Pollan, which is a great guiding principle when making that key choice about what’s for dinner.  In this article, I’ll unpeel the benefits of a few awesome foods you can add to your wellness toolkit this week.  Why not try eating your way to a more vibrant you?!

Kale

Top of the list for super foods, kale is a member of the broccoli family.  It’s rich in magnesium, potassium, and vitamin C—a combination that makes it even more potent than spinach for lowering blood pressure.  In some cases, consuming kale regularly has been shown to lower blood pressure as much as taking a blood pressure medication.  Add kale to your salad, soups, eggs, and stir fries.

Blueberries

Packed with the highest intensity of antioxidants, which help fight aging and certain types of cancer, blueberries can also help lower your cholesterol and reduce the risk of diabetes.  The chemical that gives these berries their blue color (anthocyanin) is the source of the anti-inflammatory and antioxidant properties.  Blueberries are low in calories and are known to help improve memory!  Make fresh or frozen blueberries a healthy snack choice, add them to your oatmeal or granola, and mix them in your smoothies.

Green Tea

Savored since ancient times for its health benefits, green tea has not only its own antioxidants (catechin) but also promotes your body’s ability to make nitric oxide, which has been shown to increase arterial diameter by 40%, lowering blood pressure and risk of cardiovascular disease by up to 31%.  Macha green tea, especially, has been linked with preventing several common cancers and can even be beneficial for dental health.  Studies in Japanese society (where green tea consumption is more common), showed that drinking several cups a day offered major decreases in mortality rates from all causes.  Green tea does contain caffeine, so you can swap out your coffee at the next break when you need a warm, uplifting cup.

Fish

Two to three servings per week of fish increases the Omega3 fatty acids in the diet, which improves cardiovascular health by lowering cholesterol and blood pressure.  Most of our dietary vegetable oils are high in Omega6, which, by themselves, are harmful to heart health.  Increasing Omega3 intake in proportion against Omega6 reduces risk substantially, whether this is sourced from fish, walnuts, duck eggs, olive oil, or flax seed, for example.  Oily fish like salmon are preferred for this purpose, though generally eating more fish than red meats is a healthy choice.  Tilapia raised in a clean environment has also been shown to be hearth healthy, with its boost of magnesium, potassium, and calcium.  And no, this doesn’t mean eating more fried fish because the cooking oils bring in more of those Omega6 rates again!  So poach, bake, broil, grill, or pan-fry in olive oil your next serving of clean-raised fish.

Garlic

With an active ingredient of allicin, this aromatic Sulphur compound is released when the cloves are crushed, chopped, or chewed.  But it’s valuable for more than just its culinary characteristics.  Just two cloves a day may lower blood pressure as effectively as a prescription medicine after 24 weeks, as well as can lower LDL (bad) cholesterol levels by 10-15%.  Garlic can help stabilize blood sugar levels and aid in preventing cancer, so chop them up and add them to all sorts of dishes, including roasting them with your favorite root vegetables. 

Yogurt

When they say “go with your gut,” it’s true.  Research is continually finding connections between the health of the bacteria in our gut and our emotional and mental well-being.  But not all of the flora in your alimentary tract are friendly.  Foods rich in natural and healthy bacteria cultures, like yogurt, help to improve and maintain beneficial bacteria.  There are more microbes in your gut than cells in your body, so keeping that colony happy and healthy is no small undertaking!  Make sure your choice of yogurt is labeled as having “live” or “active” culture.  It’s high levels of calcium and vitamin D can also help to prevent osteoporosis and other bone ailments.  Have some yogurt with your blueberries for breakfast or a snack, and try plain, unsweetened yogurt in a variety of savory dishes for a fun twist.

Dark Chocolate

Yes, you read that right, chocolate (in small amounts) is actually good for you.  70% cocoa or more kicks this treat into the healthy bracket.  Rich with flavonoids (which dilate blood vessels), dark chocolate has been found to improve blood pressure and your mood.  Consuming just 30 calories a day (one small square from a classic chocolate bar) has been demonstrated after 18 weeks to be effective in lowering blood pressure and raising HDL (good) cholesterol.  More is not better, though, because of the refined sugars.  So take your daily dose of a square of dark chocolate without having to apologize to anyone!

Ready to eat your way into vibrancy?  I hope you try including these delicious and healthy foods into your grocery list, pantry, refrigerator, and regimen.  Why not?  And there’s all sorts of other foods that will help to improve health and well-being.  Go for foods with deep natural colors (beets, broccoli, oranges), strong natural aromas (cinnamon, basil, onions), and distinctive natural flavors (asparagus, cashews, watermelon).  These characteristics are often markers of chemical compounds that can have their own, distinctive health benefits to offer.

This week, let food be thy medicine of choice.  Watch for more upcoming tips on great foods for wellness and longevity.  See you down on the farm sometime.

Laura Berlage is a co-owner of North Star Homestead Farms, LLC and Farmstead Creamery & Café. 715-462-3453 www.northstarhomestead.com

Posted on

Food Medicine: 5 Autumn Healers

Food Medicine: Apple, Beet, Carrot, Garlic, Pumpkin

Mother Earth gifts us every autumn with produce to heal seasonal illnesses and balance us with our natural environments.

Mother Earth News | November 5, 2020 | By Amanda Nicklaus

Now that we are post-autumnal equinox, mid-October, between a Harvest and Blue Moon, it is easy to notice the way the Earth is changing. The temperature has dropped, the leaves are dressing the trees in oranges and reds, the sky is becoming more overcast. A change of seasons makes it easier for us to have more heightened awareness than usual, and after the busyness of summer  —even a slower than usual pandemic summer — autumn offers us the chance to reflect on the year and prepare for the long cold months ahead.

Winter often brings illness and negatively-associated emotions. Thankfully, Mother Earth gifts us every autumn with produce to heal seasonal illnesses and balance us with our natural environments. We’re all aware that apples and pumpkins are in season now, as well as a variety of root vegetables. The Earth gives us exactly what we need; each of these foods holds medicinal and spiritual properties that align with the cooler seasons and bring us into balance.

Here are a few offerings from the earth that can heal and balance us this autumn:

Apples

Going apple picking at an orchard is a popular autumn activity, and while baking pies is a great way to enjoy this fall fruit, there are many reasons to make them a regular part of your diet. Apples are loaded with fiber and antioxidants and are a great source of vitamin C, which boosts immunity and keeps skin healthy. Apples also contribute to bone health and are anti-inflammatory. But this popular autumn fruit does more than just help your body fight off colds; as a symbol of love, health, wisdom, and abundance, you can use apples in your autumn and moon rituals to remind you of these qualities. And since apples have a red skin, you can use them to help balance your root chakra, helping you stay grounded through the long winter.

Beets

People either love beets or have never had them cooked right, and there are plenty of reasons to cook them until you love them. Beets have a variety of nutrients, such as fiber, iron, manganese, and vitamins B2, A, K, and C. They regulate blood flow, which is important when it starts to get cold and we lean toward a more sedentary lifestyle. Beets keep the heart and liver healthy, and they also aid digestion. The strong earthy taste of beets is a reminder that this root vegetable offers grounding qualities, and understandably, are another great food for balancing your root chakra. These deep red veggies also have a long history of being associated with passion, love, and beauty, so when the autumn and winter months begin to feel dreary, cook up a batch of beets to heighten your awareness of these necessary characteristics.

Carrots

Everybody has heard that carrots are good for your eyes, but this autumn root vegetable has much more to offer than good vision. Carrots are chock-full of vitamins A, K, B6, and C, which contribute to skin and brain health; they also contain potassium, fiber, and biotin. Carrots historically have been used to promote healthy pregnancies and ease cramps, which is hardly surprising. Orange foods balance the sacral chakra, which regulates creative and sexual flow, so if winter leaves you feeling empty and uninspired, add this vegetable into your diet!

Garlic

When you sense a cold and flu coming on, you might not think to reach for garlic, but there are plenty of reasons why you should! Garlic is used in both eastern and western medicine to prevent infection and influenza. Another vegetable containing Vitamin C and manganese, it is useful for detoxification and anti-inflammatory purposes. Maybe this is why garlic has developed a reputation for being used for protection, purification, and even exorcism. Keep lots of garlic around your home this autumn and winter (and not just for its healing properties; it also makes everything taste better!).

Pumpkins

We know we can carve pumpkins and bake them into pies, but what is lesser known is that this popular autumn food, like its orange carrot friends, is great for skin and eye health. Pumpkins contain vitamins A, B, C, and E, copper, potassium, fiber, and antioxidants. There are plenty of healthy savory ways to cook pumpkins—soups, curries, even pizzas—so don’t feel limited to pumpkin sweets, whose sugar content can weaken your immune system.

And this orange food is good for (you guessed it!) balancing your sacral chakra. Pumpkins symbolize abundance, generosity, home, and creativity, so decorating with them and increasing the intake of them in your diet does more than make it feel like fall; these autumn fruits can increase your sense of gratitude, which is key for maintaining mental and spiritual health, especially in autumn, when nature begins to minimalize its liveliness.

Winter has many beautiful aspects, but often these get lost in the negative qualities and the slow quality of time. To survive winter, we must be grounded, connected with our surroundings, aware of the very elements we endure. It makes sense, then, that we must eat more vegetables that grow directly in the ground, or ripen on the ground, foods that are red and orange, aligning with the chakras that keep our sense of groundedness and adaptability balanced. And it should come as no surprise that these vegetables and fruits contain the very nutrients we need to fight off winter illnesses and keep cold weather ailments, like dry skin, at bay.

There is no one way to maintain physical and spiritual health; each of us must tend to our own personal bodies, minds, and souls. Using foods that heal in universally similar ways, we can guide ourselves through the difficult, beautiful seasons. Mother Earth has given us all we need; it is up to us to receive and use what we have to heal ourselves and each other.

Amanda Nicklaus is a writer and aspiring urban homesteader based in Minneapolis. She spends her free time trying new recipes, going to farmers markets, and writing about everything she learns. Read all of Amanda’s MOTHER EARTH NEWS posts here.

All MOTHER EARTH NEWS community bloggers have agreed to follow our Blogging Guidelines, and they are responsible for the accuracy of their posts.