Posted on

Sous Vide Recipes

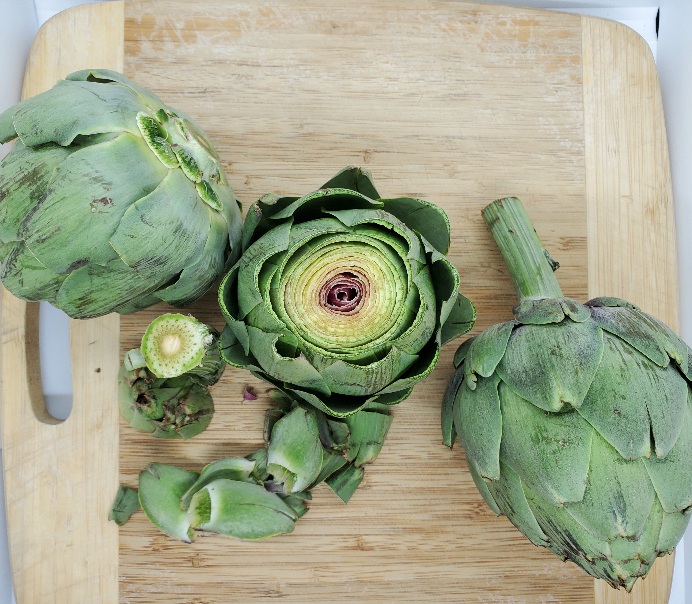
cleaning artichokes

Under vacuum. This modern trend of cooking sous vide is a literal translation of the French phrase, under vacuum. Using a tool called an immersion circulator, foods are cooked in a controlled low oxygen environment at a lower temperature for a longer period of time. This method of cooking allows sensitive items like eggs, sauces, fish, meat, and much more to cook at a slower rate. Proteins bind, fats melt slowly and render, fish maintains moisture and flakiness, and meat evenly cooks to desired temperatures. Cooking is a series of controlled chemical reactions that we put together into something delicious and beautiful. Experience a variety of textures, a depth of marinated flavor, and a scientific approach to food preparation.
Eggs: Sous Vide

Chef Leah Burback
These eggs are cooked with the sous vide method to reach the most indulgent textured egg yolk and a white that is cooked yet soft and supple. These eggs are great for benedicts, ramen, pasta, soup, and so much more.
Prep Time 2 minutes
Cook Time 1 hour 30 minutes

Equipment

  • immersion circulator
  • water bath stock pot or heat proof plastic tub
  • heat protected surface

Ingredients
  

  • fresh eggs check for cracks, shell impurities, or thin spots. Farm fresh is best!
  • warm water
  • salt
  • baking soda

Instructions
 

  • Fill a water bath with warm water to the required level for your immersion circulator. Place the bath on a heat-protected surface, affix the immersion circulator in the bath, set temperature to 145°F.
  • Make sure you preheat the water before adding the eggs.
  • Add in a pinch of salt and baking soda with the eggs once preheated.
  • Cook eggs for 60-90 minutes at 145°F until it reaches your desired consistency.
  • Crack the egg over a slotted spoon or strainer to remove the thin outer white. Place the egg gently in soup or over potato hash. The heat from the soup or hollandaise will firm up the inner white just lightly to provide texture.
  • Enjoy the velvety jammy texture of perfectly cooked eggs.

Notes

learn more about sous vide egg cookery 
https://www.seriouseats.com/sous-vide-101-all-about-eggs

Sous Vide Egg Bites

Chef Leah Hays
waterbath eggs that have a silky texture, a great make ahead for those busy morning breakfasts or brinners.
Prep Time 10 minutes
Cook Time 25 minutes
Cooling Time 1 hour
Total Time 1 hour 35 minutes
Course Appetizer, Breakfast, Side Dish, Snack
Cuisine American, French
Servings 6 x8 oz egg cups

Equipment

  • sous vide waterbath setup with immersion circulator

Ingredients
  

  • 1 dozen eggs farm fresh are best
  • cup plain greek yogurt whole milk preferred
  • 3 cloves garlic
  • ¼ cup your favorite toppings see notes for flavor combination ideas

Instructions
 

  • Preheat waterbath for sous vide to 185°F.
  • Prepare 8 oz wide mouth jars by oiling the inside, sanitizing the lids and rings.
  • Layer in your favorite toppings, no higher than the ring line.
  • Blend eggs, yogurt, seasoning, and garlic until smooth and a bit bubbly.
  • Pour egg mixture in each jar up to the ring line.
  • Wipe each jar top with a vinegar dampened towel to remove any oil or egg yolk. This will keep the water out of your jars and allow the lid to seal
  • Affix the lids and rings to all jars and insert into waterbath, once heated, for 25 minutes.
  • Remove jars from waterbath and allow to return to room temperature before chilling with the lid off in the fridge. Once completely cooled, reaffix the lids and rings and save for a quick bite.
  • Re heat from 12 minutes in the oven at 400°F or in the waterbath at 190°F for 15-20 minutes.

Notes

Try flavor combinations like:
Roasted Zucchini and Red Pepper
Roasted Broccoli, Green Onion and Cheddar
Bacon, roasted summer squash, sweet corn and salsa verde with pepperjack
Sausage and Potato hash with Swiss
Spinach Artichoke with Parmesan
Consider using this to use up leftover sides or veggies from a dinner or the last remaining half of a vegetable you didn’t need for a recipe.
Keyword 30 minute recipe, hearty vegetable, make ahead, penny saving, sous vide, thrifty, zero waste
blank

Artichokes with Hollandaise

Chef Leah Burback
Whole fresh artichokes steamed with rich zingy hollandaise sauce. Try this classic fun appetizer as a date night experience!
Prep Time 20 minutes
Cook Time 40 minutes
Total Time 1 hour
Course Appetizer, sauce, Side Dish
Cuisine American, French
Servings 4 people

Equipment

  • blender

Ingredients
  

Hollandaise

  • 10 Tbsp unsalted butter if using salted butter, skip the added salt
  • 3 each egg yolks see how to separate eggs
  • 1 Tbsp lemon juice
  • ½ tsp salt
  • tsp cayenne optional

Artichokes

  • 2 each Fresh artichokes look for bright colors and heavy feel
  • 2 slices Lemon
  • 2 each Bay leaf
  • 2 each Garlic cloves

Instructions
 

Hollandaise Sauce

  • Melt the butter on low in a small pot. Try not to let it boil—you want the moisture in the butter to remain there and not steam away.
  • Add the egg yolks, lemon juice, salt and cayenne into your blender. Blend the egg yolk mixture at a medium to medium high speed until it lightens in color, about 20-30 seconds.
  • Once the yolks have lightened in color, turn the blender down to its lowest setting (if you only have one speed on your blender it will still work), and drizzle in the hot melted butter slowly, while the blender is going. Continue to blend for another couple seconds after the butter is all incorporated. Take care not to blend too high or too long to over thicken.
  • Turn off the blender and taste the sauce. It should be buttery, lemony and just lightly salty. If needed, you can add a little lemon juice or salt to taste.
  • If you want a thinner consistency, add a little warm water. Pulse briefly to incorporate the ingredients one more time.
  • Store until needed in a warm spot and use within an hour or so. Store any unused in an airtight container. Warm over a double boiler and blend on low until smooth once more.

Steamed Artichokes

  • With a pair of kitchen scissors, snip off the tips of the artichoke leaves, they're sharp. With a super-sharp, heavy-duty knife, lop off the top of the artichoke – about 3/4 of an inch worth and cut off the stem at just below the base of the artichoke so that it will sit flat. Remove the bottom row of leaves. Rinse well under cold water.
    cleaning artichokes
  • Fill a large pot with about two inches of water and set in the artichokes, bottom side down. Optional: add a bay leaf, a slice of lemon, and/or a garlic clove. Set on the stove and bring to a boil over high heat, then reduce the temperature on the water to medium, reducing it to a simmer.
    blank
  • Cover and steam the artichokes for about 30-40 minutes, until tender. You can check for doneness by inserting the tip of a knife into the bottom (if it goes in with only a little resistance they're done) or by pulling off a tester leaf (it should come off easily). Remove from water, allow to cool a bit, and serve with warm hollandaise or garlic herb butter.
    blank
Keyword artichokes, date night, hollandaise, mother sauce, steamed, tasting dinner, valentine’s day menu
blank

Sous Vide Beef Tenderloin

Leah Burback
a simple method to infuse more flavor and fat into a lean but delicious piece of meat.
Prep Time 15 minutes
Cook Time 2 hours 30 minutes
Sear and Rest Time 30 minutes
Total Time 3 hours 15 minutes
Course Main Course
Cuisine American, French, sous vide
Servings 2 people

Equipment

  • immersion circulator(sous vide setup)
  • Cooking bag (vacuum, silicone, or otherwise sous vide approved bag.)
  • saute pan or grill pan for searing
  • tongs
  • basting spoon

Ingredients
  

  • 2 ea beef tenderloin
  • 6 Tbsp butter or coconut oil, beef fat, or bacon fat
  • 6 cloves garlic, smashed
  • 2 sprigs fresh herbs try rosemary, thyme, sage, basil, oregano
  • salt and peppercorn medley try an applewood smoked sea salt for a smoky indoor flavor without the grill.

Instructions
 

  • Preheat the sous vide (immersion circulator) waterbath to 125°F for Rare- Medium Rare. 133°F for Medium. 140°F Medium Well. 149°F for Well Done.
  • Portion clean, trimmed beef tenderloin into 3 inch tall portions. Tie with cotton butchers twine to hold the round medallion shape while cooking.
  • Season Beef with salt and pepper on all sides.
  • Place tenderloin and all other ingredients in a vacuum bag of your choice, remove most of the air from the bag.
  • Place sealed bag in waterbath, double checking for water leaks, and cook for 2 hours and 30 minutes.
  • Heat a cast iron saute pan or grill to a medium high heat. If doing so indoors on a stove, be sure to use a hood vent to not smoke out the house. Add a small amount of high heat oil to the pan, once heated just before searing.
  • Remove the tenderloin from the bag, careful to reserve the aromatics, butter and juices inside. Sear beef on two flat sides until deep golden brown and carmelized.
  • If searing in a sauté pan, add reserved juices and allow milk solids in the butter to brown. Baste meat by spooning buttery juices over the medallions until moistened.
    blank
  • Remove meat and crispy garlic cloves from the pan, cut twine to remove from meat, and let rest for 15 minutes covered in foil.
  • Slice, sprinkle with salt, and serve with your favorite seasonal vegetable sides and include the carmelized garlic for sweet punch of flavor.

Notes

Consider adding other seasonal flavors or spice this up with chile flakes. A great south american alternative cooking marinade would be a chimichurri sauce. 
Try pairing with sides like roasted root vegetable medley, fresh seasonal salads, or your favorite warm grains. 
Keyword aromatic, beef, butter, fresh herbs, reverse sear, sous vide
Posted on

Asian Veggie Namkeen Recipes

Lettuce Wraps

Namkeen is an Urdu word for a savory or salty light meal or tidbit. Nibble your way through more veggies! These recipes use some of the most well-known vegetables in the fridge, in a different way. Use simple techniques to really bring the flavor out of leftover shredded cabbage, carrots, green onions, cauliflower and so much more.

Yachaejeon or Pajeon (Korean Vegetable Pancake)

Use the medley of vegetables that are ready in the spring to make a delicious side dish, snack, or lunch. These hearty pancakes will soon become a favorite quick recipe.
Prep Time 25 minutes
Cook Time 5 minutes
Total Time 30 minutes
Course Appetizer, Lunch, Side Dish, Snack, tasting dinner
Cuisine American, Asian, Korean
Servings 4 servings

Equipment

  • griddle or saute pan

Ingredients
  

  • ½ cup all-purpose flour try red spring, einkorn, or white sonora
  • ½ cup potato starch or 1/4 cup each white rice flour and cornstarch
  • ¾ tsp salt and to taste
  • ½ tsp baking powder
  • ¾ cup ice water
  • 1 each large egg
  • ¼ cup finely chopped kimchi or sauerkraut
  • 4 cups finely chopped or grated spring veggies carrots, cabbage, radish, onion, kale, bell pepper, leeks, or any combination
  • 4 Green Onions cut into 2-inch-long sections and thinly sliced lengthwise
  • 2 Tbsp Coconut or Sesame oil plus more as needed

FOR THE DIPPING SAUCE:

  • 3 Tbsp soy sauce also try liquid aminos or coco aminos
  • 2 tsp rice wine vinegar
  • 1 tsp finely grated fresh ginger or garlic
  • ½ tsp sesame oil
  • 1 Pinch granulated sugar or drizzle of honey

Instructions
 

Pancake Batter

  • In a large bowl, whisk together flour, starch, salt and baking powder.
  • Combine water, egg, and kimchi. Whisk the kimchi mixture into the flour mixture, and whisk until smooth.
  • Fold in vegetables and about ¾ of the Green Onions. (Save the rest for garnish.)
  • In a large nonstick griddle to medium heat, heat 2 tablespoons of oil.
    Scoop 2 oz portions of batter onto the skillet, as many as will fit while not touching, flatten, and fry until dark golden on the bottom, about 2 to 3 minutes.
  • Flip and continue to fry until the other side is browned, 2 to 3 minutes. Transfer to a paper towel-lined plate and sprinkle with a little more salt. Continue with remaining batter.

Dipping Sauce

  • In a small bowl, stir together soy sauce, vinegar, ginger or garlic (if using), sesame oil, and sugar. Sprinkle sliced green onions over pancakes, and serve with dipping sauce on the side.
Keyword appetizer, aromatic, cabbage, carrots, hearty vegetable, onion, pancake, sauce
Lettuce Wraps

Asian Lettuce Wraps

Chef Leah Burback
A traditional meat and veggie combination seasoned with soy, oyster, and fish sauces.
Prep Time 20 minutes
Cook Time 20 minutes
Total Time 40 minutes
Course Appetizer, Side Dish
Cuisine Thai
Servings 12 wraps

Ingredients
  

  • ½ lb your choice of meat diced chicken, ground beef, ground turkey, ground wild game
  • 3 cups cauliflower, riced
  • 1 cup broccoli stalks, grated
  • 1 cup carrots, diced
  • 1 cup cabbage, diced red, chinese, or bok choy
  • 1 Tbsp fresh ginger, minced
  • 3 cloves garlic, rough chopped
  • 2 Tbsp fish sauce
  • 1 oz oyster sauce
  • 1 oz soy sauce
  • 2 Tbsp chili garlic sauce i.e. sambal, sriracha,
  • 1 oz rice vinegar
  • 1 oz mirin (rice cooking wine)
  • 1 Tbsp cornstarch
  • 4 each green onions, sliced white and green
  • to taste salt and pepper
  • 1 head Bibb or buttercrunch living lettuce
  • as desired radish or spicy salad microgreens

Instructions
 

Veggie and Meat Filling

  • Brown your meat of choice in a large saucepan, season lightly with salt and pepper to start infusing flavor. Once cooked through, reserve to let cool on the side.
  • Saute the cauliflower and broccoli until softened, add in carrots and cabbage until slightly carmelized. Add in ginger, garlic and saute until nice and aromatic. Season slightly with salt and pepper.
  • In a small container combine all the sauce liquids and cornstarch, mix well.
  • Fold in the browned meat to the veggie mixture and add the sauce on medium low heat.
    Taste check when bubbly and thickened, stirring frequently. Taste check for seasoning and reserve for service.

Wrap Assembly

  • For family style service wash and seperate bibb lettuce leaves and place on the table next to the filling with a serving spoon. Each wrap should hold about ¼-⅓ cup of filling and additional toppings.

Notes

Consider serving with Microgreens, sliced radishes, water chestnuts, crushed peanuts or sunflower seeds, pickled vegetables, or fermented hot sauces.
If you are looking for a more traditional thai flavor, consider adding a couple Tbsp of tamarind paste, this adds a unique sour and sweet flavor. This is specific to thai or hispanic foods.
Keyword appetizer, lettuce wraps
blank

Pickled Radishes and Leeks

Chef Leah Burback
Pickle bright colored radishes and get a lighter onion flavor with strips of leeks. Use as a topping for tacos, rice bowls, or cheese plate.
Prep Time 20 minutes
Cook Time 5 minutes
Total Time 25 minutes
Course condiment, garnish, Salad, Snack, tasting dinner
Cuisine American, Asian, Latin American
Servings 4 cups

Equipment

  • mandolin (slicer)

Ingredients
  

  • 2 bunches radishes breakfast, daikon, watermelon radishes or a combination
  • 1 whole leek Trim the dark green leaves and root end and reserve for leftovers stock!
  • 1 quart purified water
  • 1 Tbsp sea salt
  • 1 tsp sugar or honey

Instructions
 

  • Slice radishes and leeks into wheel shapes of even thickness. Wash in cold water well in ensure no grit remains.
  • Heat half of the water and add salt and sweetener of choice to dissolve fully. Add in remaining cold water to reduce temperature.
  • Pack veggies into one quart jar. cover with brine, weight down veggies to keep submersed if necessary. Cover with airlock lid or open once per day over the next several days.
  • Ferment for 7-10 days until the color starts to noticeably change. Test for texture and flavor, make sure the brine keeps the veggies covered during fermenting.
  • Quick Pickle Method: Heat 3/4 water until boiling, add in salt and sweetener, and 1/2 cup apple cider vinegar. Pour over veggies and let sit until room temperature, serve immediately or cool completely with lid off, use within two weeks.
Keyword 30 minute recipe, condiments, fermentables, garnish, penny saving, pickles, thrifty